

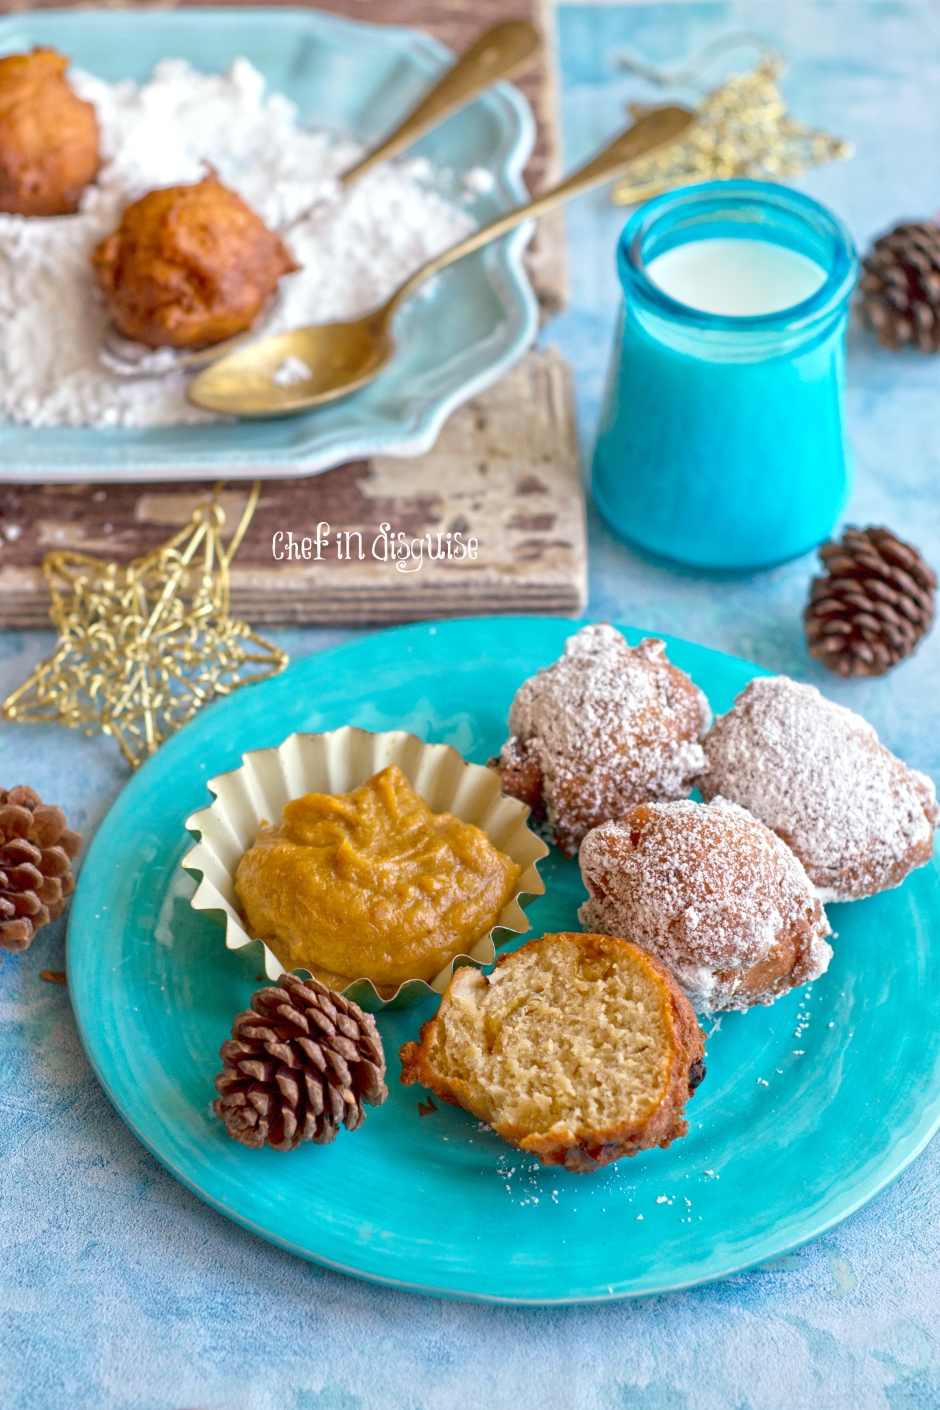
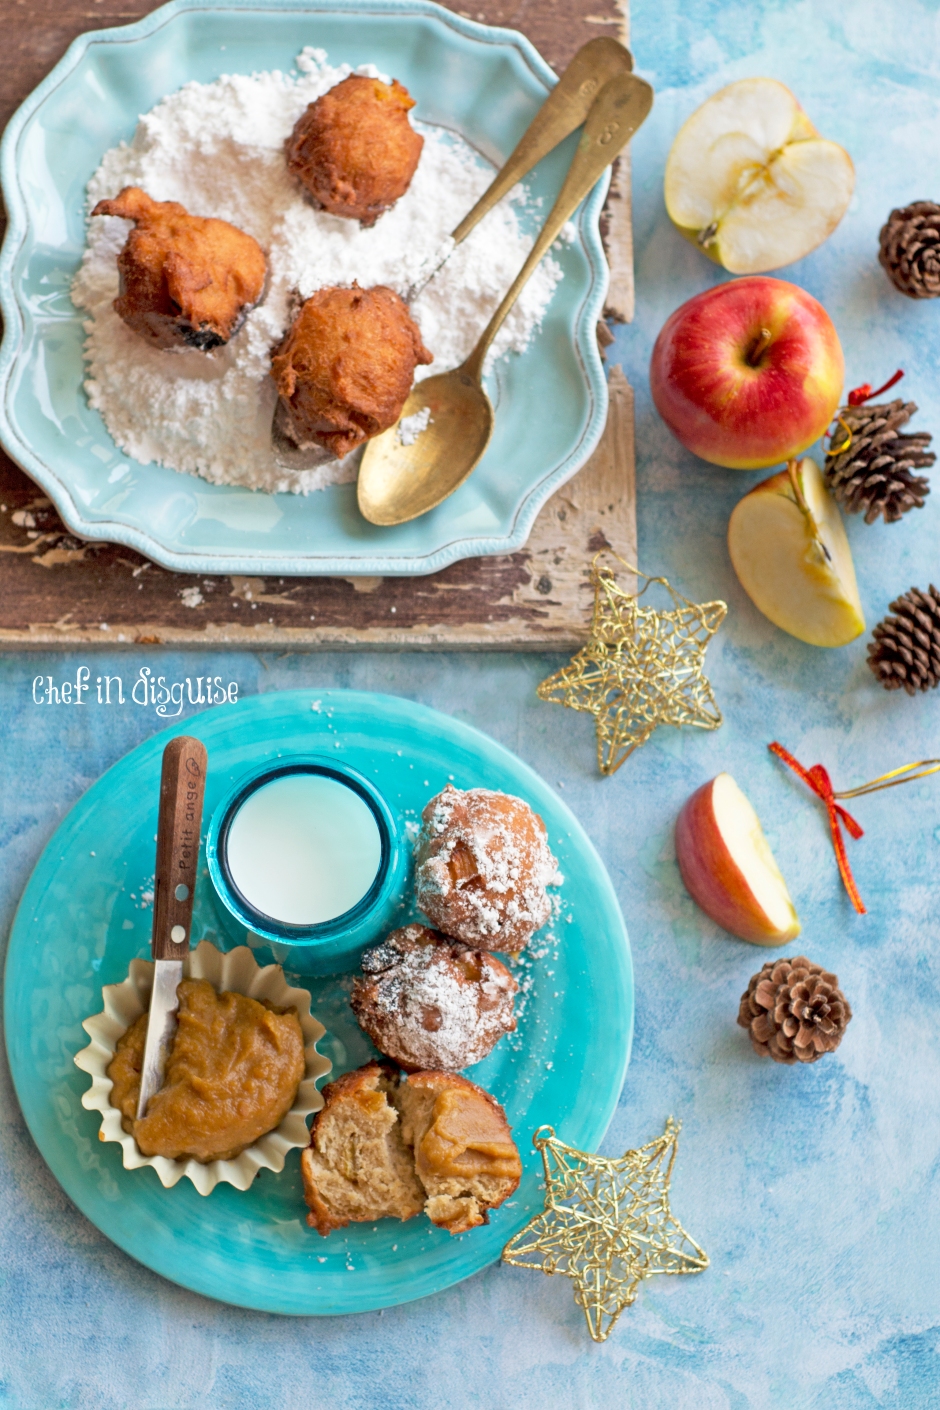
The December 2016 Daring kitchen challenge was to make Dutch Oliebollen (commonly called Dutch Donuts). Traditionally, these little sugar dusted apple and raisin studded spheres of bliss are eaten throughout the winter months in the Netherlands but particularly on new year’s eve.
I have missed so many daring kitchen challenges this year. I was determined not to miss this final challenge! But more importantly, a very dear friend of mine is from the Netherlands. When I saw the title of this challenge I just knew I had to make it, for her, so Margret if you are reading this, this post goes out to you.
Oliebollen is a big deal in the Netherlands, during the winter months you’ll find mobile oliebollen bakeries everywhere . An important newspaper yearly publishes the Big Oliebollen Test, creating an enormous sales boost for the winners, but criticizing the losers to pieces.
The historical roots of oliebollen can be traced back to the Batavians and Frisians around the start of this era. At that time they were not round but flat, cooked in a small amount of oil. They were called oliekoeken. In the middle ages a tradition was born of giving the poor people oliekoeken when they came to wish you a happy new year. Only in the wealthy 17th century people started to use more oil, and make these round oliebollen.
Francijin our host was kind enough to explain the names for those of us who don’t speak Dutch, allow me to breakdown the words oliekoeken and oliebollen for you: olie (pronounced: ow-ly) means oil. Koeken (singular: koek, pronounced: cook, cooken) is something like big cookies. Oliekoeken might look like fried flatbreads. Bollen (singular: bol, pronounced: ball, ballen) means balls/spherical buns.
I made the recipe as written by Francijin with one exception. The recipe calls for beer, I don’t drink alcohol so I researched alternatives and found out that soda and non alcoholic malt beverage are the best alternative for beer in baking so I used the malt beverage.
I also tried to bake some of the batter, I just scooped it into a muffin tin and topped each with a sprinkle of demerara sugar. The result was very tasty. Something between apple and raisin bread and a muffin. I know this is not the traditional way, after all it is called Oliebollen because of the oil! but if you are someone who is too worried about frying , perhaps you can try the recipe this way 🙂

Dutch Oliebollen Recipe
Servings: 25 oliebollen (each around 6cm / 2.5″ in diameter)
Ingredients
300g / 2 1/2 cups whole wheat flour
200g / 1 1/2 cup plus 5 teaspoons all-purpose flour
10g / 3 teaspoons instant yeast
10g / 1 1/2 teaspoons salt
25g / 2 Tablespoons caster sugar (white or light brown)
3g / 1/2 teaspoons cinnamon
150ml / 1/2 cup plus 2 Teaspoons alcohol free malt beverage (room temperature)
The original recipe calls for beer but since I do not drink alcohol, I replaced it with malt beverage
175ml / 3/4 cup water (make sure it is room temperature)
175ml / 3/4 cup milk (make sure it is room temperature)
50g / 3 1/2 Tablespoons melted unsalted butter (it should be melted but not hot)
1 small egg
200g (7 oz, or 1 1/3 cups) raisins
1 small apple or half a big apple (a firm variety)
Directions:
1. In a large mixing bowl mix flours and yeast with a whisk.
2. Add salt, sugar and cinnamon, and mix again.
3. Add the malt beverage, water and milk (mind the room temperature), the melted butter, and the egg.
4. Attach the paddle to your mixer (or the dough hook, if you don’t have one) and mix the ingredients thoroughly. Go on until the dough becomes elastic, a few minutes.
5. Let the dough rest for 15 minutes.
6. In the meantime cut the apple in small cubes, as big as peas or beans.
7. Add raisins and apple to the dough, and mix well with a spatula.
8. Put a wet towel over the bowl, and let the dough rise for an hour, until is has nearly doubled in size.
9. In the meantime, put the oil in a pot. Heat it to 180°C / 355°F.
10. Get ready for cooking: place a tray on the counter and cover it with two layers of paper towels. Have something ready to place your scoops on, to not cover your counter with grease. And have a timer handy, to track frying time.
11. Once the dough has doubled in size and the oil is hot, dip your ice scoop in the oil to avoid sticking, and fill it with dough, leveling it against the side of the bowl. Take care to include a reasonable amount of filling.
12. Release the doughball carefully into the oil, by sticking the scoop into the oil and pulling the lever. For now, don’t add more oliebollen. Start the timer.
13. Observe the behavior of the oliebol. It will start floating around, and after some time, it will turn over automatically. That way, in the ideal situation, it will brown on both sides. If the oliebol doesn’t turn over, help it when the frying time is halfway over, using a fork.
14. After five minutes of frying, take it out of the oil and put it on the tray with paper towel. Wait a minute, and then cut it through the middle with a sharp knife. Look at the center. Do you see raw dough? Then you should have cooked it longer. Do you see a bread-like texture? Then it is done, and you could even try to shorten the cooking time.
15. If you are satisfied with the texture? Then start again, but now with a few oliebollen at once. Are you not satisfied? Try again with a longer or shorter frying time.
16. Keep frying until there is no dough left, and make sure the oliebollen are all the same size, otherwise they will need different cooking times. Don’t forget to start the timer with each batch, and remember that the ones you put in first, should be taken out first.
17. Oliebollen are best when you eat them while they are still hot and crunchy. Sprinkle them with powdered sugar and enjoy!I personally served mine with some date caramel sauce (dates + hot water + nut butter of your choice).
They are still great at room temperature, but next day you will miss the crunchiness. If you wish to reheat them: preheat the oven to 150-160°C / 300-320°F / Gas Mark 3, and heat the oliebollen for 5 minutes.
Storage & Freezing Instructions/Tips
Eat your oliebollen within a few days. Don’t store them in the refrigerator.
Oliebollen freeze very well. Just put them in an airtight container and you can enjoy them for month
One final note about the daring kitchen
The daring kitchen challenges are coming to an end and this will be the very last one. I am really heart broken to see this group come to an end. I hate the fact that the mad speed we are all living in is making people walk away from traditional recipes, blogging and online content in general. No one seems to have the time to read a long post or watch a video that is longer than 30 seconds! the number of bloggers taking part in the monthly daring kitchen challenges has been on a steady decline and as a result, it has been decided that the Dec 2016 challenge will be the very last one.
I have met some of the most talented bloggers I know through the Daring kitchen. Manu, Rachael, Renata and so many others.Some of my family’s all time favorite recipes like Chicken ballotine, macarons, Momofuku milk bar crack pie (I know! the name really says it all!), chocolate and spice layered cake with caramel topping and gevulde speculaas (another irresistible Dutch recipe) were actually daring kitchen challenges.
Before I end this post I would like to send Rachael, a deep and heartfelt thank you for allowing me to share the adventure of running the daring kitchen with her. It has been a pleasure and an honour to work with someone so dedicated and passionate.
Rachael, I couldn’t possibly find the words to express the respect and gratitude that I have for you. Thank you for being one of the most amazing people that I have ever met.
Sticking with my resolution to focus on the full half of the cup,I have decided that once a month, I will select one of the old Daring kitchen challenges that I have missed or one that was published before I became a member. I will be posting the results on the 27th of each month. There is a wealth of inspiration and information in the daring kitchen challenge archive and I promise you’re going to love the result. If you would like, you can share the experience with me, I could announce which challenge I will be making every month and we can bake it or cook it together , what do you think, would you like that?
وصفه اليوم هي من المطبخ الهولندي. يتم تحضير هذا النوع من الدونت في شهور الشتاء و تراثيا يقدم في اخر ليله من العام. يمتاز هذا النوع من الدونت بشكله الكروي و باحتوائه على التفاح و الزبيب مما يضيف له طعما رائعا
الدونت الهولندي بالتفاح و الزبيب
المكونات
2 1/2 كوب طحين القمح الكامل (300 غرام)
كوب بالإضافة إلى 5 ملاعق طحين لجميع الأغراض (200 غرام)
3 ملاعق خميرة فورية
1 1/2ملعقة شاي ملح
2 ملاعق طعام من السكر الناعم (ابيض او بني)
نصف ملعقة صغيرة قرفة
1/2 كوب زائد 2 ملاعق الشاي شراب شعير
3/4 كوب ماء (تأكد من أنها درجة حرارة الغرفة)
3/4 كوب حليب (تأكد من أنها درجة حرارة الغرفة)
50 غرام من الزبدة غير المملحة (يجب أن يكون ذائبه ولكن ليست حاره)
1 بيضة صغيرة
كوب و ثلث زبيب
1 تفاحة صغيرة أو نصف تفاحة كبيرة
الطريقة:
1. نخلط نوعي الدقيق مع الخميره
2. يضاف الملح والسكر والقرفة، وتخلط مرة أخرى.
3. نضيف شراب الشعير والماء والحليب ، والزبدة المذابة، والبيض.
4. وتخلط المكونات جيدا و نستمر بالعجن حتى نحصل على عجينه طريه متجانسه.
5. نترك العجين ليرتاح لمدة 15 دقيقة.
6. في هذه الأثناء نقطع التفاح الى مكعبات صغيرة.
7. يضاف الزبيب والتفاح إلى العجين، ويخلط جيدا مع ملعقة.
8. نضع منشفة مبللة على الوعاء، نسمح للعجين ان يرتاح و يتخمر، حتى يتضاعف تقريبا في الحجم.
9. وفي غضون ذلك، نضع الزيت طنجره على النار حتى تصبح حرارته 180 درجة مئوية / 355 درجة فهرنهايت.
10.نجهز صينيه قرب طنجره القلي عليها طبقتين من المناشف الورقية لامتصاص الزيت.
11. بمجرد تضاعف العجين نغمس مغرفه المثلجات في الزيت و نملأها بالعجين و نضع الكره الاولى في الزيت
12. سوف تبدأ كره العجين بالطوف، وبعد مرور بعض الوقت،ستتحمر على الجهه الاولى و تنقلب للجهه الاخرى. اذا لم تنقلب من تلقاء نفسها نقلبها نحن ز نترك العجين من 3-5 دقائق ثم ننتشلها من الزيت و نقطعها من المنتصف بسكين حاد لنتفحص المركز.. هل لا زال هناك عجين غير مخبوز؟ اذا يجب أن يكون قليها لفترة أطول. اما اذا كان المركز يشبه الكيك و لا عجين فيه فهي جاهزه و سيكون الوقت الذي قليناها فيه هو المعيار لباقي الحبات
13. نبدا بقلي الدونات و لكن تأكدوا ان لا تضيفوا عددا كبيرا من كرات العجين للزيت دفعه واحده لان هذا سيؤدي لتبريد الزيت و الى ان يمتص العجين كميه كبيره من الزيت
14 حاولوا ان تكون الحبات متساويه بالحجم قدر الامكان لتنضج معا و تذكروا ان اول حبه توضع في الزيت هي الاولى التي يجب عليكم انتشالها
تكون هذه الدونت في الذ حالاتها و هي دافئه و مقرمشه. فقط قوموا برشها بالقليل من السكر الناعم و استمتعوا
ملاحظات
بامكانكم تسخين الدونت في اليوم التالي لمده 5 دقائق في الفرن على درجه حراره 180 مئويه . سيكون الطعم لذيذا و لكن القرمشه ستختفي
بامكانكم الاحتفاظ بالحبات الزائده في وعاء محكم الاغلاق في الفريزر لعده اشهر. كل ما عليكم عندما ترغبون باكلها هو ان تسخنوها في الفرن
بامكانكم خبز الدونت في صينيه الكب كيك بدلا من قليها. قوموا برش السطح بالسكر قبل الخبز و قدموها مع القليل من الكراميل او صوص الشوكولا و استمتعوا
