
This is the fourth post in my series featuring Palestinian ingredients. I am sorry it is two days late. A flu and a fever missed up my posting schedule! But since I am much better today, I thought that posting one of my all time favorite Palestinian recipes, would be the perfect way to end 2017 🙂
Manakish, simply put, are a form of flat bread topped with one or two toppings at most (the toppings are purely Middle Eastern pantry staples like zaatar, labneh, Nabulsi cheese or eggs). Since so many of you enjoy knowing the meaning and the root of the Arabic recipe names, the word manakish is plural of mankosheh . The word mankosheh comes from the root nakash which means ‘that which is decorated with colors, writing or that which is engraved’ . This type of bread was named manakish because the toppings color and decorate the otherwise plain bread.

In the Levant (Palestine, Jordan, Lebanon and Syria) , manakish are a popular breakfast item (I mean what’s not to like about freshly baked bread, topped with creamy labneh , stretchy melted cheese or my personal favorite nutty spicy zaatar! ). If you walk into any bakery in the Levant in the morning you will be enchanted by the smells of rows upon rows of freshly baked pita bread and you will be spoiled for choice between all the different manakish toppings ranging from the traditional mentioned above to the modern like turkey and cheese or nutella and banana!
I honestly don’t advise walking into any of those establishments first thing in the morning, unless you really want to test your self control and fail every single time! (I will be in and out in 5 minutes, she said! I will only get whole wheat bread for the kids’ sandwiches! she said!)

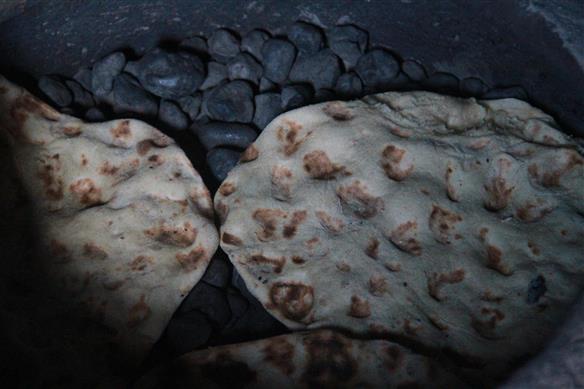
Today’s recipe is my go to recipe for zaatar manakish that is just as good if not better than the stuff you buy at the bakery! The bread part of the recipe is actually my recipe for taboon bread (one of the key ingredients in Musakhan). But before getting to the ingredients and instructions, allow me to tell you a little more about the taboon. The word taboon refers to the oven that this type of bread is baked in. Taboon ovens are Palestinian traditional small clay ovens handmade from a special kind of clay that is mixed with hay. The taboon ovens are usually built outside the house in a very small room dedicated to the oven.The small clay oven is buried into the ground in that small room and it is lined with small smooth rocks called “rodof” or “rothof” .The oven has a metal cover that seals it and it is heated by covering the oven with dried leaves, wood and other leftovers that the peasants had on hand then setting those on fire for a number of hours! That process caused the inside of the oven to heat up to very high temperatures. That heat was retained into the rodof rocks was then used to cook or bake the food in these traditional ovens.

Bread baked in taboon ovens has a very characteristic dimpled appearance due to the small stones that line those ovens.
Taboon ovens were a way for peasants to cook their food using what they had available on hand, relying mainly on the leftovers as fuel and on the design and build of the oven to get the maximum heat out of that fuel. Taboon ovens also played a key role in the life of Palestinian villagers because usually 2 or 3 families would share the same oven. The women would meet up in the morning to bake their bread, chat and even sing. There are beautiful traditional songs that are dedicated to the taboon ovens and the bread baked in them.

With the fast beat of modern life, those traditional ovens are slowly fading but many family’s still hold on to their taboon ovens and use them on a daily basis. I sadly don’t have a taboon oven but since I love this bread so much, I have tried to mimic the same effect. To do that, I gathered some small rocks at the beach, cleaned them thoroughly and now they are my dedicated taboon baking stones. If you don’t live near the sea, you can find smooth rocks at hardware stores, or you can skip the stones all together and bake the bread on a regular baking sheet. Using the stones (if you can find them)will give the bread its traditional dimpled appearance and will keep it softer and chewier because the high heat retained in the stones will bake the bread super quickly before it dries out. (the same way a pizza stone gives you better chewier pizza)
Now after this short walk down the lane of traditional kitchens and ovens, we can get to the recipe 🙂
![]()
Zaatar Manakish
For the dough
1 cup whole wheat flour
3.5 cups all purpose flour
2 cups warm water
1.5 teaspoons salt
1 tablespoon sugar
1 tablespoon instant yeast
2 tablespoons olive oil
For the topping
2 cups of zaatar
1/2 cup olive oil
Directions
- Mix the zaatar with the olive oil for the topping, set it aside
- Heat your oven to the highest temperature it will go
- Place a pan filled with smooth rocks in the oven and allow it to heat for at least 15-20 minutes (using the rocks is optional, you can bake the bread on a regular baking sheet or even in a pan on the stove top)
- In your stand mixer or in a bowl, mix the two types of flour with the olive oil. Rub the olive oil into the flour until it is completely incorporated
- Add the yeast and sugar and mix again
- Slowly add the water and knead the dough till you get a smooth ball of dough (you may need slightly more water or less than that mentioned, different types of flour take up water differently and the weather and humidity also tends to affect the amount of water that you will need)
- Add the salt and continue kneading for 10 more minutes
- Brush a bowl with oil and place the dough in it and cover it with a clean moist cloth. leave it in a warm place till the dough doubles in size (1 hour to 1.5 hours)
- Gently deflate the dough and divide it into 4 balls (or more if you would like your bread to be smaller)
- Flour your working surface with whole wheat flour and roll out each ball of dough into a circle that is 1 cm in thickness
- Cover the rolled out dough with a clean dry cloth to prevent it from drying out
- Start with the first dough circle, poke it with a fork or use your finger tips to create little dimples all over the dough surface (this is important to prevent the dough from ballooning during baking)
- Spread the zaatar mix on top of the dough
- Take the pan with the stones out of the oven and quickly place the dough on top of the stones and return the pan to the oven
- Keep a close eye on the bread, it only takes a few minutes for it to bake
- Carefully remove the bread from the pan (sometimes little stones get stuck to the under surface of the bread so keep an eye out for those)
- Place the bread on a cooling rack and cover it with parchment paper topped with a clean dry cloth or place it in a deep bowl or dish and cover it with the pan’s lid or clean cloth(the idea is that we need to trap the steam to soften the bread and make sure that it remains soft and chewy after cooling down completely. If you don’t do this, it will dry out and be more of a cracker!)
- Repeat the steps with the remaining manakeesh
- Enjoy with your favorite cup of tea. I love black tea with a spring of sage but mint works beautifully too
