
This post is long overdue, this gorgeous cake was our daring bakers challenge for January (I know!) but hey, better late than never 😛
For the month of January Jelena from A Kingdom for a Cake invited us to start this year with a dreamy celebration cake. She challenged us to make the Esterhazy cake a.k.a the Hungarian dream. What better way to start the year than with a sweet dream?
When the challenge was posted my first thought was: this cake must have been created for royalty because most of these fancy decadent European cakes are. A bit of research proved that I was right! In the 19th century, a confectioner from Budapest baked and named the Esterhazy Torte after the wealthy Prince Paul III Anton Esterhazy de Galantha, a member of the Esterhazy dynasty and diplomat of the Austrian Empire.
This cake was proclaimed by the kids to be the best daring bakers cake that I have ever made! In a category that includes the Austrain Sachertorte, the Sweedish prinsesstarta, the layered cholocolate cake with caramel frosting only to name a few. That is an impressive title and I have to say that the cake deserves it!
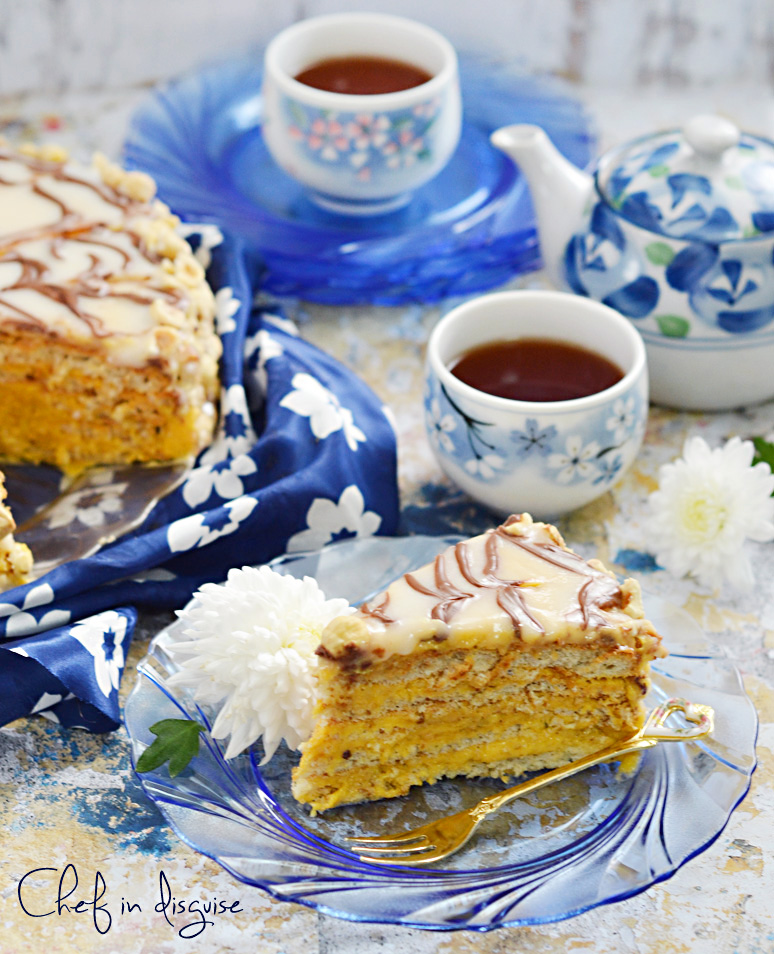
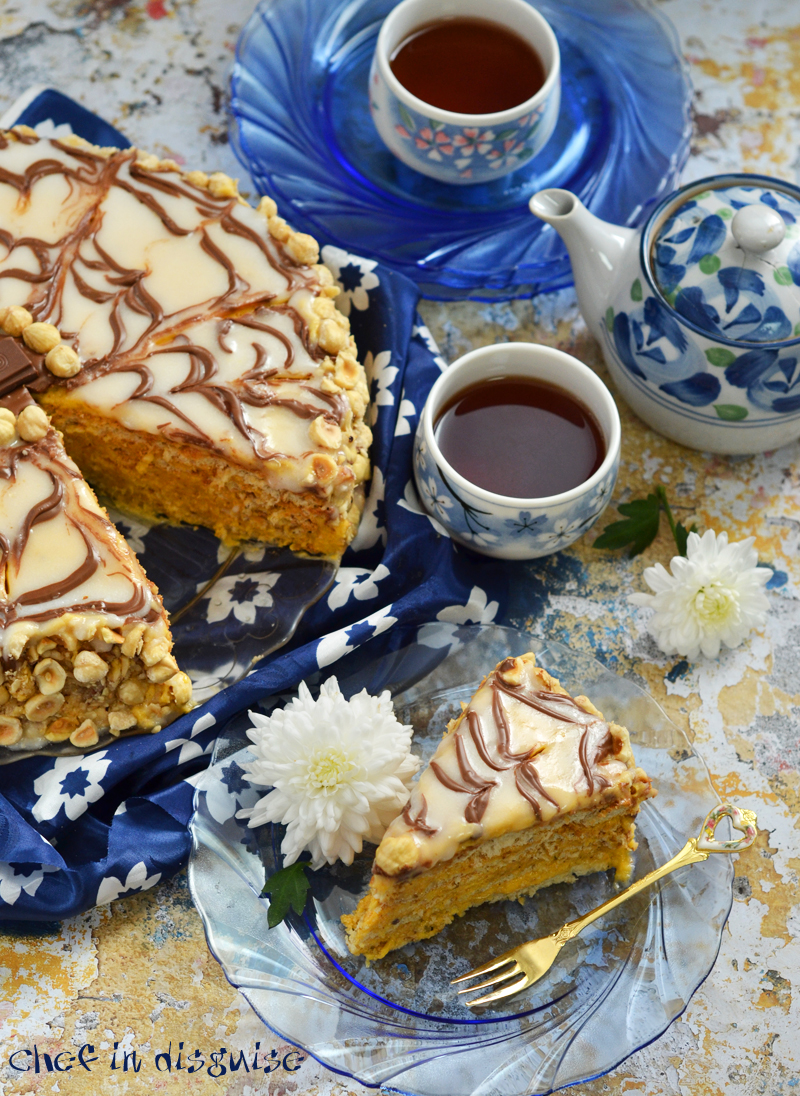
The Esterhazy cake is a beautiful melody of flavors: hazelnut sponge cake layers : light, airy and nutty. The hazelnut infused cream is velvety smooth and provides the perfect compliment for the cake layers. A lemony icing which provides an interesting contrast to the rich and nutty hazelnuts, swirled with chocolate, simply because hazelnuts and chocolate are a match made in heaven.Add some toasted hazelnuts for decoration and crunch and you have a truly enchanting cake that is fit for royalty.

The cake is time consuming (though I am sure the previous paragraph convinced you that it is indeed worth every minute). I personally did it over two days: I baked the sponge layers, made the cream, stacked and filled the cake on day 1. Then on day two I added the icing, chocolate swirl and toasted hazelnut decoration.
As you can see from the pictures I totally missed up the spider web chocolate decoration because my icing was a little on the runny side, I would suggest adding the hot water 1 teaspoon at a time, whisk and give the icing a minute or two before you decide to add more water. The cake was still very tasty despite the chocolate miss on top of it lol

Recipe : Esterhazy Torte
Servings: 10-12, Original recipe in metric
(you can half the recipe, I did)
Ingredients
HAZELNUT SPONGE LAYERS
12 large egg whites
1 cup plus 1 tablespoon (9 oz) (250 gm) caster (superfine) sugar
2 tablespoons (2/3 oz) (20 gm) vanilla sugar
2½ cups (9 oz) (250 gm) ground hazelnuts
2/3 cup (2¾ oz) (80 gm) plain (all purpose) flour
HAZELNUT CREAM
12 large egg yolks
1 cup plus 1 tablespoon (9 oz) (250 gm) caster (superfine) sugar
2 tablespoons (2/3 oz) (20 gm) vanilla sugar
1 -1/3 cups (10½ oz) (300 gm) butter at room temperature
1½ cups (5-1/3 oz)(150 gm) toasted ground hazelnuts
APRICOT JAM GLAZE
around 3 tablespoons (45 ml) (1-2/3 oz) (45 gm) apricot jam
1 teaspoon (5 ml) water
WHITE ICING
2½ to 3¼ cups (10-2/3 to 14 oz) (300-400 gm) icing (powdered) (confectioners’) sugar
2 teaspoons (10 ml) sunflower oil
3-4 teaspoons (15-20 ml) lemon juice
around 4 tablespoons (60 ml) hot water
CHOCOLATE DECORATION
¼ cup (1¾ oz) (50 gm) dark chocolate
1 teaspoon (5 ml) oil
¾ cup (3½ oz) (100 gm) roughly chopped hazelnuts
Directions:
HAZELNUTS
Weigh/measure the hazelnuts that you need for the entire recipe (that includes the hazelnut for the cake layers, cream and decoration)The total is 500 grams
Place the hazelnuts on an oven tray in a cold oven, increase the temperature to moderate 180°C/350°F/gas mark 4, and bake until a nice aroma starts to come out of the oven and the nuts have become darker.
Continue until their skins almost turn black or dark brown and the hazelnut ‘meat’ becomes a caramel colour. You will need to watch the oven carefully since the nuts can easily burn.
From time to time, just open the oven and carefully try one to see if the centre is nice and crispy, but be careful not to burn yourself. It should take about 15-25 minutes.
This baking process brings out the nuttiness of the hazelnuts, that is the key flavor in the cake.
Let them cool.
Set aside ¾ cup (3½ oz) (100 gm) toasted nuts and roughly chop them. These will go around the cake at the end.
The rest need to be ground. A grinding machine is best since a food processor might turn the hazelnuts into a creamy mush. If you are using a processor do it in short pulses so they do not have the consistency of peanut butter but of fine powder.

Divide the ground hazelnuts into 2 batches of 2½ cups (9 oz) (250 gm) and 1½ cups (5-1/3 oz) (150 gm) for the sponge layers and the filling respectively.
HAZELNUT LAYERS (Dacquoise layers)
With an electric mixer beat the egg whites while gradually adding the sugar and vanilla sugar for about 5 minutes until stiff peaks form.
Turn the mixer to the lowest speed and add in the hazelnuts mixed with the flour and beat until just combined.
Cut baking paper into five squares large enough to draw a circle of 10 inch (25cm) in diameter on the squares.
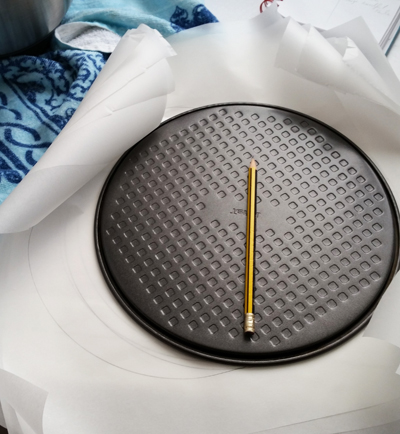
Turn the paper over and place one piece onto an up-side down oven tray and delicately spoon inside the circle one-fifth of the beaten egg white mixture.
Place the tray into an preheated moderate 325°F/160°C/gas mark 3 (no fan) oven and bake for 14 minutes. It will look soft but that is how we want them. Your finger should not stick to the layer when you touch it.
Take the layer out together with the paper and place on an even surface
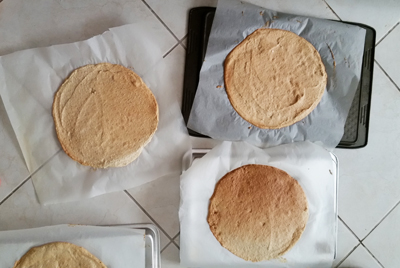
Cool the oven tray and repeat with the next 4 layers. It is important that the up-side down oven tray is cool when you start to bake the layers.
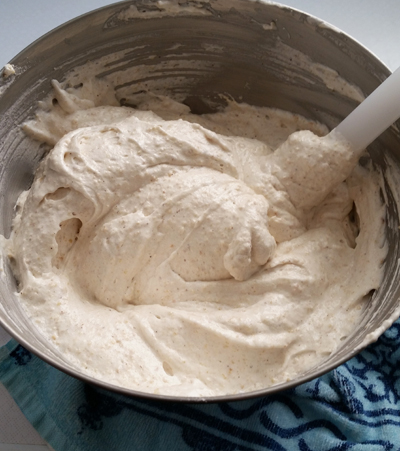
HAZELNUT FILLING
The filling is cooked in a double boiler. If you do not have a double boiler just take two pots so that the smaller one fits perfectly in the larger one and there is no gap between them.
Fill the larger pot with about 1-inch (2 cm) water place on the stove and bring the water to a slow boil, the water should not touch the smaller pot bottom.
Beat the egg yolks and the sugar with an electric mixer in the smaller pot for 30 seconds.
Place the smaller pot into the larger one and cook for 14-15 minutes.
Stir with a wooden spoon always scraping the sides and the bottom.
Cook until you get to a thick cream consistency, the mixture should coat the back of a wooden spoon and the cream should be thick enough to allow you to draw a line across the back of the spoon
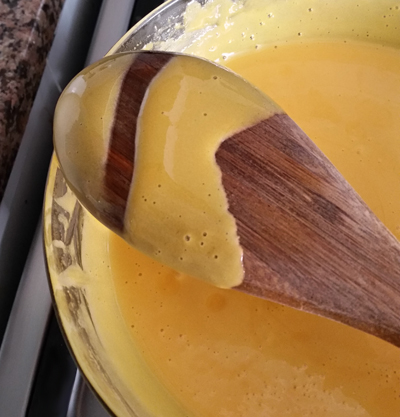
Let the filling cool.
Beat the cooked yolks for 30 seconds with an electric mixer.
Beat the room temperature butter for 2 minutes until light and fluffy then beat into the cooked yolks.
Add in the ground hazelnuts and beat again until combined.
Set aside 3/4 of a cup of the filling to cover the torte at the end.
Divide the rest of the filling into 4 parts (about a cup each)
Line your serving dish with some baking paper.
Remove the baking paper from one of the dacquoise and place it onto the tray, spread one quantity of filing evenly over the dacquoise, then place another layer on the top.

Repeat, making sure that the last layer is placed bottom-side-up (do not place filling on this surface) which will make it easier to obtain a smooth looking finish.
Place some baking paper over the torte. Press a bit with your hands to even it out, put another tray over the torte and now place something heavy on the top to allow the torte to level up. A pan half-filled with water will be fine.
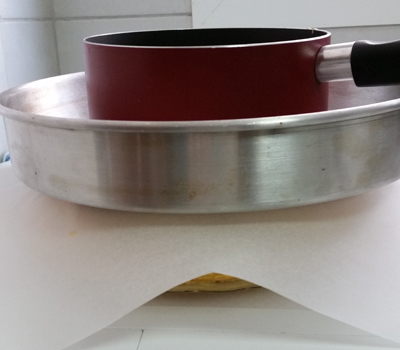
Place the whole torte with the pot in the fridge for one hour.
Take the cake out of the fridge and trim the edges if they are not already even
APRICOT JAM GLAZE
Heat the apricot jam and water on the stove.
Remove the top baking paper from the torte and spread the jam on top of it. We want a very thin layer, just barely covering the torte.
Place the torte back in the fridge for 30 minutes for the jam to cool.
When the 30 minutes is up, spread the 2 tablespoons of reserved hazelnut filling around the cake.
(I didn’t have any apricot jam on hand so I simply glazed the whole cake with hazelnut filling)
WHITE ICING
By hand mix the powdered (icing) (confectioners’) sugar, oil, lemon juice while adding teaspoon by teaspoon of hot water until the mixture is creamy, but not runny. Mix vigorously for a couple of minutes. The sugar should be lemony.
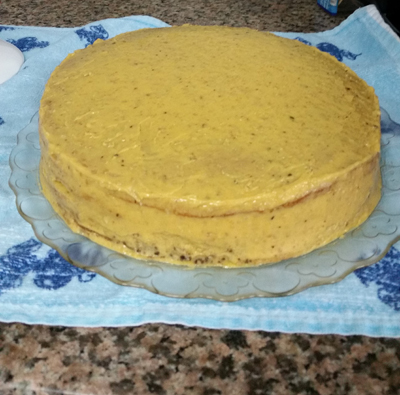
With a hot wet large knife quickly spread the icing over the apricot layer.
You will need around 2½ to 3¼ cups of powdered sugar but it is better to have more than less, since when you start spreading you cannot go back. You will have some left over icing. If it is a bit uneven just turn on the hair dryer and heat the icing so it will smooth out a bit.
DECORATION
Before starting with the icing have the chocolate ready since it needs to go onto the soft icing in order to get the web.
Melt the chocolate with a teaspoon of oil, place in a pipping bag, or a plastic bag with a cut in the corner that will act as the tip.
Draw four (4) concentric circles onto the cake, then with a knife (not the sharp side) or a wooden skewer run six (6) lines at 30 degree angle to the cake to get the decoration (see pictures for more details). Each line should be in a different direction. One running away from you and the next one running to you.
Press the remaining crushed hazelnuts around the cake to complete the decoration.

Let rest in the fridge for at least 24 hours before tasting. This cake that gets better as times goes by. We usually enjoy ours for 7 days.
Storage & Freezing Instructions/Tips: Keep it refrigerated, covered with a cake dome, or something similar.
It’s suitable for freezing.
Notes:
The nuts: This recipe traditionally uses toasted hazelnuts. Nowadays, the hazelnuts are often substituted with almonds (in parts of Austria) or walnuts (mainly in Hungary).
Preparation time: This Torte is not to be rushed in preparation and I recommend to make the layers one day and the rest of the cake the following day, or to assemble it but leave the decoration for another day.
وصفة: استرهازي تورتى
(يمكنك بسهوله استخدام نصف المكونات للحصول على كعكه اصغر)
المكونات
كيكه البندق الاسفنجيه
12 بياض بيض كبير
1 كوب زائد 1 ملعقة طعام (9 أونصة) (250 جم) سكر
2 ملعقة طعام (2/3 أونصة) (20 جرام) سكر الفانيليا
2½ أكواب (9 أونصة) (250 جم) بندق مطحون
2/3 كوب (2¾ أوقية) (80 جم) طحين متعدد الاستخدامات
كريما البندق
12 صفار بيض كبير
1 كوب زائد 1 ملعقة طعام (9 أونصة) (250 جم) سكر
2 ملعقة طعام (2/3 أونصة) (20 جرام) سكر الفانيليا
1 -1/3 كوب (10½ أوقية) (300 جم) زبدة في درجة حرارة الغرفة
1½ أكواب (5-1 / 3 أوقية) (150 جم) بندق محمص مطحون
سائل تلميع مربى المشمش
حوالي 3 ملعقة طعام (45 مل) (1-2 / 3 أوقية) (45 جم) مربى المشمش
1 ملعقة صغيرة (5 مل) المياه
التغليفه البيضاء
2½ أكواب ل3¼ (10-2 / 3 إلى 14 أوقية) (300-400 جم) سكر ناعم
2 ملعقة شاي (10 مل) زيت عباد الشمس
3-4 ملاعق صغيرة (15-20 مل) من عصير الليمون
حوالي 4 ملاعق كبيرة (60 مل) الماء الساخن
شوكولا للتزيين
¼ كوب (1¾ أوقية) (50 جم) الشوكولاته الداكنة
1 ملعقة صغيرة (5 مل) زيت
¾ كوب (3½ أوقية) (100 جم) البندق المفروم تقريبا
الطريقه
البندق
قومي بوزن / قياس البندق التي تحتاجينه للوصفة كاملة (الذي يتضمن البندق لطبقات الكعكة، و كريما والديكور) والمجموع هو 500 غرام
ضعي البندق على صينية الفرن في فرن بارد، ثم اشعلي الفرن على درجة الحرارة إلى 180 ، و اتركي البندق في الفرن حتى تشمي رائحة لطيفة و يصبح لونه ذهبيا
دعي البندق في الفرن حتى يصبح داخل البندق بلون الكاراميل الفاتح. يجب عليكي مراقبه الفرن بحرص لان المكسرات تحترق بسهوله
الهدف من تحميص المكسرات هو ابراز نكهتها و هي النكهه الاساسيه في الكعكة.
ما ان يتحمص البندق اخرجيه من الفرن و دعيه يبرد
ضعي جانبا ¾ كوب (3½ أوقية) (100 جم) من البندق المحمص و افرميه فرما خشنا. وستكون هذه الكميه زينه جوانب الكعكة في نهاية المطاف.
اطحني باقي البندق بمطحنه بهار لو توفرت لديكي..اذا استخدمتي محضره طعام شغليها بشكل متقطع . الهدف هو الحصول على بندق مطحون طحنا ناعما
تقسيم البندق االمطحون إلى قسمين..احدهمت 2½ كوب (250 جم) و الاخر 1½ كوب (150 جم)
طبقات كيك البندق
في الخفاق الكهربائي اخفقي بياض البيض حتى تحصلي على قمم رخوه ثم اضيفي السكر و الفاتيلا بشكل تدريجي و اخفقي حتى تحصلي على قمم صلبه
خففي السرعه و اضيفي البندق و الطحين و اخفقي فقط حتى يتجانس المزيج
جهزي 5 مربعات من ورق الخبز و ارسمي على كل منها دائره قطرها 25 سم
اقلبي الورق بحيث يصبح الرسم على الجهه السفليه كي لا يلامس الحبر او الرصاص خليط الكعك
قسمي الخليط بين الدوائر الخمس
ضعي كل ورقه على صينيه خبز مقلوبه
اخبزي الدوائر في فرن على درجه حراره 160 و اخبزيها لمده 14 دقيقه. ستبدو طريه ولكنها يجب ان تكون كذلك
انا خبزت كل اثنتين معا
كلما نضجت احدى طبقات الكعك اخرجيها من الفرن و دعي الصينيه تبرد تماما قبل ان تضعي الورقه التاليه عليها
حشوه كريما البندق
ضعي الماء في قاعده غلايه مزدوجه. إذا لم يكن لديك غلاية مزدوجة استخدمي اثنين من الأواني بحيث تكون احداهما أصغر من الاخرى و يمكن وضع الصغيره داخل الكبيره بدون وجود فجوه كبيره بينهماا.
املئي الوعاء الأكبر بحوالي 1 بوصة (2 سم) من الماء و ضعيه على النار ليغلي، ينبغي أن لا تلمس المياه قاع الوعاءالأصغر.
اخفقي صفار البيض والسكر معا و ضعيهما في الوعاء الاصغر
ضعي الوعاء الاضغر داخل الاكبر و اطبخي خليط السكر و البيض على بخار الماء مع التحريك المستمر حتى يثقل المزيج و يغلف ملعقه خشبيه بحيث يمكنك رسم خط على ظهر الملعقه باصبعك
ارفعي خليط السكر و البيض عن النار و دعيه تبرد
اخفقي الزبده حتى تصبح خفيفة وزغبة ثم اضيفيها الى خليط صفار البيض المطبوخ
اضيفي البندق المطحون و اخلطي حتى يتجانس
ضعي جانبا 3/4 كوب من الحشوة لتغطية الكعكه في نهاية المطاف.
قومي بتقسيم ما تبقى من الحشوة إلى 4 أجزاء (حوالي كوب لكل منهما)
يبطن طبق التقديم الخاص بك ببعض ورقة الخبز.ضعي طبقه الكيك الاولى و ضعي عليها ربع الحشوه و افرديها ثم ضعي فوقها الطبقه الثانيه و كرري العمليه
