

Do you know Kenny Chisney’s song” don’t blink”?
My little angel’s birthday was on Sunday.It seem like it was only yesterday when I first saw those big brown eyes for the first time and knew my life will never be the same again.It feels as if I took this picture only yesterday

and then I blinked and there she was a beautiful 2nd grader off to school everymorning
One thing is for sure, I ‘m not blinking again!
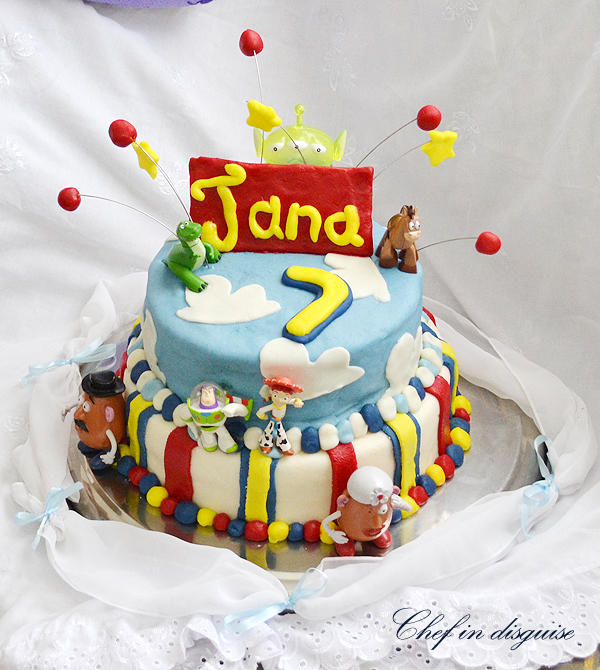
The birthday girl requisted a toy story cake and she wanted it to be two teir. Yours truly has never made a two teir cake before and to do it for a birthday party full of guests didn’t help ease the tention.
I divided the work into 2 days, bake the cakes, make the ganache and fondant on day one. Fill and decorate the toy story cake the next day. Everything went smoothly until it was time to add the fondant. It had been raining for 3 days and humidity was high to say the least. No matter how much sugar I added to the fondant the humidity made it too soft! it gave me a very hard time and decorating the cake requred twice the time I expected it to. The original plan was to make my own toy story figures. Small out of fondant or large rice crispy treat figures but with all the trouble fondant gave me I opted out and decided to use the toy story toys we had.

The birthday girl was super excited and happy to help with rolling the fondant balls, cutting out the clouds and stars and when the cake was all done she was literally jumping with joy. I on the other hand was not too happy with the way the fondant came out. It was not smooth or tidy despite the fact that I spent a long time smoothing the ganache under it. However, seeing how happy Jana was made up for it. It was her cake, meant to make her happy and in that sense it was a huge success.

Toy story birthday cake
-
Cake recipe
My go to cake for decorating ( here)
-
MMF
(marshmallow Fondant. Step by step tutorial here)
-
Filling :
Cherry pie filling for one layer
Preserved fruits in syrup
-
Chocolate ganache
Ingredients
2:1 chocolate to cream (is you use 200 grams chocolate you need 100 ml cream)
Instructions
Chop the chocolate or
pour the cream over the chocolate.
Microwave using 30 seconds intervals.
After each interval stir the mix gently.
When the chocolate melts completely and the mixture is smooth, your ganache is ready.
Allow it to cool to room temperature (it is best if you allow it to rest for 24 hours but if you don’t have the time you can put it in the fridge for an hour after it cools down to room temperature)
Bake the cake
Bake your cakes and allow them to cool (It would be even better if you would do this the day before)
I made double the provided cake recipe and it gave me a 10 inch and a 7 inch cake
Divide your cakes into 2 or more layers (I did 3 layers )
Brush with simple syrup or the liquid in the preserved fruit can.
Assembling the toy story cake
Fill the cake with your desired filling
It helps to make a dam of frosting or ganache around the filling to prevent it from bulging out once the cake layers are placed on top of each other

Frost each cake with a thin layer or ganache.

Place in the fridge for 10-15 minutes.
Place some boiling water in a glass an place a metal spatula in it until the metal is hot and use it to smooth the ganache

Roll out your fondant on a sugar dusted surface or on some corn flour
Carefull transfer the fondant and drape it over the cake and smooth gently.
Using a straw measure the thickness of the bottom cake then cut 6-7 straws or skewers or dowels to that thickness and insert them into the cake.These will act as support for the top cake preventing it from sinking into the bottom one
Decorate to your heart’s desire. I used cookie cutter and small fondant balls . I used the colors ot the toy story logo: red, yello , blue.
You can find a tutorial I did for a princess cake before for the step by step on how to decorate a cake with fondant.
There is also this video that my friend Rafiqa sent me that shows the step by step to decorating a cake with fondant. I hope this helps and if you have any questions please don’t hesitate to ask.
